 developer-guide Reference
Gallagher Mobile Connect SDK for iOS - Developer Guide
Contents
- Prerequisites
- Getting Started
- Mobile Credentials
- Reader Discovery and Access
- Background Access
- Salto
- Digital ID
- Aperio BLE
- Wallet
- Frequently Asked Questions
- Customising the SDK
- Troubleshooting
- Configure Logging (Optional)
- I’m not Receiving Mobile Credential Updates (i.e. Digital ID or Salto) from the Cloud
- Why is WalletUpdateDelegate returning empty Wallet list?
- Wallet Pass Provisioning is Failing
- Wallet Feature Calls onWalletMigrationDetected Within the Provisioning Flow
- User Has Passes on Both Phone and Watch but
shouldShowAddToWalletButtonFunction is Suggesting Showing the Button - Deactivating the Mobile Credential Doesn’t Deactivate the Apple Pass
- Add Apple Pass is Active But the User is Getting Access Denied at the Reader
- Key Recommendations and Considerations When Displaying the “Add to Apple Wallet” Button.
Prerequisites
- This developer guide references version 17.2 of the Gallagher Mobile Connect SDK for iOS
- Xcode 16 - This document tested against Xcode 16.4 (16F6)
- An app targeting iOS 12 or later
- Swift 6.0 - The functionality and interfaces provided by the SDK are swift; you must use swift to access them.
Getting Started
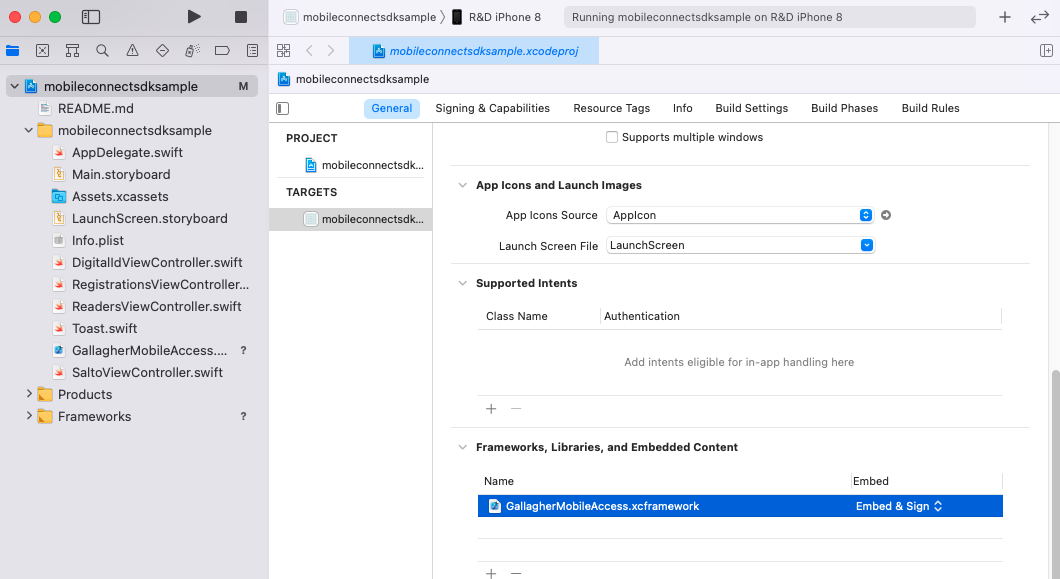
1. Add the SDK Framework to Your Project
Unzip the zip file and add GallagherMobileAccess.xcframework to your Xcode project. The easiest way to do this is as follows:
- Select your application’s project in Xcode
- Select the target for your app
- Select the General tab
- Scroll down and expand “Frameworks, Libraries and Embedded Content”
- Add
GallagherMobileAccess.xcframeworkby dragging and dropping it from the Finder into the list.
Example:
Note: The sample project may contain a reference to SaltoJustINMobileSDK.xcframework.
If your Command Centre server does not have a Salto integration, then you will not need this, and you can remove the reference.
3. Configure Your Application - Plist
Add the following to your app’s Info.plist:
<key>NSBluetoothPeripheralUsageDescription</key>
<string>Used to detect and connect to Gallagher Bluetooth® enabled readers for access.</string>
<key>NSBluetoothAlwaysUsageDescription</key>
<string>Used to detect and connect to Gallagher Bluetooth® enabled readers for access.</string>
<key>NSFaceIDUsageDescription</key>
<string>Use Face ID to access secure areas that require two factor authentication.</string>
You may wish to customise the text.
4. Configure the Mobile Connect SDK within Your Application
The SDK must be configured before it can be used. To do this, call the MobileAccessProvider.configure method.
Thereafter you can gain access to the SDK using the static MobileAccessProvider.instance method. If you attempt to access instance before configure() a fatal error will be thrown and your program will exit.
The configure method may be called with no arguments, or you may customise any of
databaseFilePath: Optional. The filesystem location at which the SDK stores its internal SQLite database. You shouldn’t need to set this, it is just here as a failsafe in case the SDK’s default database path clashes with something in your app.localization: Optional. Allows you to customise UI messages used by the SDK. See the Customising SDK Messages section.enabledFeatures: Optional. If you would like to use the Digital ID feature or Salto integration, you useenabledFeaturesto specify this.
Once the SDK is configured, you may want to call the setScanning(enabled: true) method to activate scanning for readers using Bluetooth Low Energy. Here is an example of an application which starts scanning and auto-connect upon launch.
import GallagherMobileAccess

@UIApplicationMain
class AppDelegate: UIResponder, UIApplicationDelegate {
    let mobileAccess: MobileAccess

    init() {
        mobileAccess = MobileAccessProvider.configure()
    }

    // ... other code ...

    func application(_ application: UIApplication, didFinishLaunchingWithOptions launchOptions: [UIApplicationLaunchOptionsKey: Any]?) -> Bool {
        mobileAccess.isAutomaticAccessEnabled = true
        mobileAccess.setScanning(enabled: true)
        return true
    }
At this point you should be able to compile and launch your app, and the setScanning method should not crash.
The SDK will not do anything however, until you register at least one mobile credential.
Reference:
MobileAccessProvider
MobileAccess
Mobile Credentials
In order to gain access or communicate with readers over Bluetooth, you must first have a registered credential to authenticate your user and device.
Mobile credentials are created in Command Centre, either using the Command Centre Client, or via the Command Centre REST API.
For more information, see the REST API documentation regarding Creating Cards and Cardholders.
1. Registering a Mobile Credential
The key piece of information needed on the phone is the Invitation Code, which is commonly embedded in an Invitation URL.
Credentials are normally issued to the Gallagher Mobile Connect app by sending an email from the Gallagher Cloud. This email contains the invitation URL and Code in it. For your own app, you most likely do not want emails sent from Gallagher, so you may use the REST api to create credentials and retrieve the invitation URL from there.
If you have an invitation code alone, then you can build the invitation URL using the resolveInvitationUri method in the Mobile Connect SDK, which will generate the full URL from the code, and a hostname. You should use https://commandcentre-ap-southeast-2.security.gallagher.cloud for the hostname if you are doing this.
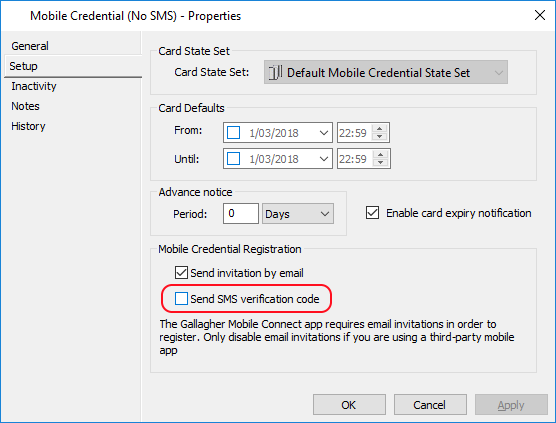
When getting started, the easiest option will most likely be to use the Command Centre Client to send yourself an invitation via email, and copy the invitation code from the “Manual Registration” section of the standard Gallagher invitation email message.
If you do this, be sure to create a new Mobile Credential Card Type, and untick the “Send SMS Verification Code” option for the Mobile Credential Card Type.
SMS verification is not supported for third-party apps using the Mobile Connect SDK.
Once you have obtained the invitation URL, use the registerCredential(URL, RegistrationDelegate) method to begin the registration process. The SDK will asynchronously call the callback methods on the RegistrationDelegate to inform you of success or failure. Callbacks will arrive on the main thread.
There is also an overload to the registerCredential method which accepts two callback functions, rather than a single RegistrationDelegate object, which may be more convenient.
Example:
guard let invitationUrl = mobileAccess.resolveInvitationUrl(serverHost, invitation: invitationCode) else { return }

// using callback overload, rather than delegate directly
mobileAccess.registerCredential(
    url: invitationUrl,
    onRegistrationCompleted: { credential, error in
        if let error = error {
            toast("Registration Error \(error)")
        }
        else {
            toast("Registered!")
        }
    },
    onAuthenticationTypeSelectionRequested: { selector in
        // If the credential allows for second-factor authentication, then we need
        // to ask the user which method they'd prefer; Fingerprint or PIN?

        // pop a dialog here and ask the user their preference
        let userChoice = .pin
        selector(true, userChoice)
    })
For a comprehensive example, please see the file RegistrationsViewController.swift in the iOS SDK sample application.
Reference:
MobileAccess
RegistrationDelegate
MobileCredential
SecondFactorAuthenticationTypeSelector
SecondFactorAuthenticationType
2. Listing Registered Credentials
Use the mobileCredentials property. This will return an array of MobileCredential - which you should copy into your own array or other stable collection.
3. Deleting a Mobile Credential
Use the deleteMobileCredential(MobileCredential, CredentialDeleteCompletedHandler) method. The SDK will asynchronously call the completion lambda CredentialDeleteCompletedHandler to inform you of success or failure. Callbacks will arrive on the main thread.
You can obtain a reference to the credential object to delete by getting mobileCredentials. Mobile Credential objects have an id which you should use if you wish to compare instances.
Example:
mobileAccess.deleteMobileCredential(credential) { (credential, error) in
    if let error = error {
        toast("Error deleting credential \(error)")
    }
    else {
        toast("Deleted!")
    }
}
For a comprehensive example, please see the file RegistrationsViewController.swift in the iOS SDK sample application.
MobileAccess
CredentialDeleteCompletedHandler
MobileCredential
Reader Discovery and Access
1. Tracking Whether the SDK is Working or Not
There are a variety of reasons why the SDK may not work even though you have called setScanning(enabled: true), such as Bluetooth being disabled in your device system settings, lack of permissions, etc.
You should use the addSdkStateDelegate(SdkStateDelegate) method. The SDK will asynchronously call the callback methods on the SdkStateDelegate to inform you of state changes. Callbacks will arrive on the main thread.
You may wish to log these state changes, or prompt the user to perform some action (such as granting permissions, or giving them a button to click to enable Bluetooth, etc)
Example:
mobileAccess.addSdkStateDelegate(self)
// ...
func onStateChange(isScanning: Bool, states: [MobileAccessState]) {
    var messages = [String]()

    for state in states {
        switch state {
        case .noCredentials:
            messages.append("Please register a credential")
        case .noPasscodeSet:
            messages.append("Please set a passcode on your device")
        // ...
        }
    }

    // display messages in a TableView for example
}
Reference:
MobileAccess
SdkStateDelegate
MobileAccessState
2. Auto-connect
You must set the isAutomaticAccessEnabled property to true in order to enable auto-connect. You can set it to false to disable it later if you require.
Note that enabling and disabling automatic access does not affect bluetooth scanning, which continues until you call setScanning(enabled: false)
By default, the Mobile Connect SDK will automatically attempt to connect to any nearby readers if the device enters the configured range.
If you wish to be informed about auto-connect events, use the addAutomaticAccessDelegate(AccessDelegate) method. The SDK will asynchronously call the callback methods on the AccessDelegate to inform you of success or failure. Callbacks will arrive on the main thread.
Any calls to addAutomaticAccessDelegate should be balanced by a call to removeAutomaticAccessDelegate to prevent memory leaks.
Example:
override func viewDidLoad() {
    super.viewDidLoad()
    mobileAccess.addAutomaticAccessDelegate(self)
}

deinit {
    mobileAccess.removeAutomaticAccessDelegate(self)
}

// ...

func onAccessStarted(reader: Reader) {
    updateDisplayState(reader, .active)
}

func onAccessCompleted(reader: Reader, result: AccessResult?, error: ReaderConnectionError?) {
    if error != nil {
        updateDisplayState(reader, .failed);
    } else if let accessResult = result {
        updateDisplayState(
            reader,
            result.isAccessGranted() ? .succeeded : .failed);
    }
}
Reference:
MobileAccess
AccessDelegate
Reader
AccessResult
ReaderConnectionError
3. Discovery of Readers
Call the addReaderUpdateDelegate method to provide a ReaderUpdateDelegate object to be called when a reader is discovered via Bluetooth.
If you wish to show an interactive list of nearby readers in your application, you can use this to maintain a list of readers and other related information (such as visual state, appearance, etc) and display that information.
If your app only wants to use the auto-connect feature of the Mobile Connect SDK, then you can skip this section; The SDK will work regardless of whether you call addReaderUpdateDelegate
Example:
//...
mobileAccess.addReaderUpdateDelegate(self)
//...

func onReaderUpdated(_ reader: ReaderAttributes, updateType: ReaderUpdateType) {
    if updateType == .attributesChanged {
        if let idx = readers.index(where: { $0.reader.id == reader.id }) {
            replaceReaderInList(idx, reader)
        } else { // a new reader
            addReaderToList(reader)
        }
    } else if updateType == .readerUnavailable {
        if let idx = readers.index(where: { $0.reader.id == reader.id }) {
            removeReaderFromList(reader)
        }
    }
}
For a full example, refer to ReadersViewController.swift in the SDK sample app, specifically the onReaderUpdated method of the ReadersViewController.
Reference:
MobileAccess
ReaderUpdateDelegate
ReaderAttributes
ReaderUpdateType
4. Manual Connect
Once you have discovered a reader, you can manually initiate an access request using the requestAccess(Reader, AccessDelegate) method. The SDK will asynchronously call the callback methods on the AccessDelegate to inform you of success or failure. Callbacks will arrive on the main thread.
Example:
func onReaderClicked(reader: Reader) {
    mobileAccess.requestAccess(reader: reader, delegate: self)
}

// ...
func onAccessStarted(reader: Reader) {
    updateDisplayState(reader, .active)
}
func onAccessComplete(reader: Reader, result: AccessResult) {
    updateDisplayState(reader, .succeeded)
}
func onAccessError(reader: Reader, error: ReaderConnectionError) {
    updateDisplayState(reader, .failed)
}
For a full example, refer to ReadersViewController.swift in the SDK sample app, specifically the above-named methods in the ReadersViewController class.
Reference:
MobileAccess
Reader
AccessResult
ReaderConnectionError
5. Actions/Overrides
If the readers are configured to support it, the Mobile Connect SDK can ask the reader to perform actions such as overriding to Arm/Disarm the alarm zone, locking or unlocking, or toggling configured outputs.
This is a two step process. First you must request the list of available actions, and then you must request to perform the specific action.
5.1 Enumerating the List of Available Actions
Use the enumerateReaderActions(Reader, ReaderActionEnumerationCompletedHandler) method. The SDK will asynchronously call the completion lambda ReaderActionEnumerationCompletedHandler to inform you of success or failure. Callbacks will arrive on the main thread.
Example:
mobileAccess.enumerateReaderActions(reader: reader) { (reader, actions, error) in
    if let error = error {
        toast("enumerateReaderActions failed: \(error)")
    }
    else if let actions = actions {
        if actions.count == 0 {
            toast("No actions available")
            return
        }

        showListOfAvailableActions(actions)
    }
}
Reference:
MobileAccess
ReaderActionEnumerationCompletedHandler
Reader
ReaderAction
ReaderConnectionError
5.2 Performing an Action
Use the requestReaderAction(Reader, ReaderAction, ReaderActionCompletedHandler) method to perform a specific action. The SDK will asynchronously call the completion lambda ReaderActionCompletedHandler to inform you of success or failure. Callbacks will arrive on the main thread.
Example:
// The ReaderAction object comes from the enumeration step
mobileAccess.requestReaderAction(reader: reader, action: action) { (reader, action, error) in
    if let error = error {
        toast("action error: \(error)")
    }
    else {
        toast("\(action.name) succeeded")
    }
}
For a full example, refer to ReadersViewController.swift in the SDK sample app, specifically the above-named methods in ReadersViewController mentioned above.
MobileAccess
ReaderActionCompletedHandler
Reader
ReaderAction
ReaderConnectionError
Background Access
By default, the SDK will continuously scan for and connect to Bluetooth enabled readers while it is running in the foreground. This is the standard behaviour for iOS applications.
If you would like it to only scan (for example) when a particular ViewController is on-screen, then you should use the setScanning method to control this.
If you would like the SDK to scan for readers while it is not visible in the foreground, you will need to enable background access.
There are two “levels” of background access functionality
1. Standard Background Access
This employs the default Apple Core Bluetooth background processing behaviour, as determined by Apple. This behaviour may (and has in the past) change between iOS versions. For more information refer to Apple’s Core Bluetooth Background Processing Documentation
Enabling standard background access requires no code changes.
Add the following to your app’s Info.plist
<key>UIBackgroundModes</key>
<array>
    <string>bluetooth-central</string>
</array>
Unfortunately, beginning with iOS 10, Apple aggressively throttles background scanning in order to conserve battery life. The observed behaviour of “standard” background access on an iOS 10 or newer phone is generally that nothing appears to happen when the app is not in the foreground, however you can usually “trigger” background access as follows:
- Lock the phone screen
- Approach and place your phone next to a reader
- Turn the phone screen on - The act of turning the phone screen on seems to trigger Apple’s background behaviour
As per Apple’s documentation, even when your app is running in the background iOS may kill it after some time. The exact rules around when and if iOS will kill it vary and change over time, but generally if you make heavy use of your phone, you can expect iOS to kill it more quickly in order to free up resources for other apps.
2. Extended Background Access
The Mobile Connect SDK offers an improved ability to scan for readers in the background, however this requires your app to request use of Background Location services. The SDK does not actually use or monitor the user’s location at all, but the permission is required to enable the extended scanning mode.
To enable this, you must do the following
Set the SDK’s
backgroundScanningModeproperty to.extendedEnable iOS background location services as according to Apple’s Requesting Always Authorization documentation. In summary - use
CLLocationManager.requestAlwaysAuthorization(), and add the required keys to your Info.plist.
Example:
<key>NSLocationAlwaysUsageDescription</key>
<string>Your location is needed to detect readers using Bluetooth®. GPS is not used and your location is never shared.</string>
<key>NSLocationAlwaysAndWhenInUseUsageDescription</key>
<string>Your location is needed to detect readers using Bluetooth®. GPS is not used and your location is never shared.</string>
<key>NSLocationWhenInUseUsageDescription</key>
<string>Your location is needed to detect readers using Bluetooth®. GPS is not used and your location is never shared.</string>
...
<key>UIBackgroundModes</key>
<array>
    <string>location</string>
    <string>bluetooth-central</string>
</array>
The observed behaviour of “standard” background access on an iPhone is generally that access works regardless of whether the app is visible or the screen is powered on or off, however iOS will still kill the app periodically if it is in the background for a period of time.
Extended background scanning also uses more battery - causing a roughly 10% additional drop in battery life over a work-day period.
3. Background Access Notifications
If the SDK determines that we are within auto-connect range of a reader, but that reader requires second factor authorisation, it will display a Notification asking the user to open the app.
This is required because second factor authorisation involves asking the user for a passcode or fingerprint, which isn’t possible unless the app is visible in the foreground.
By default however, iOS does not allow notifications unless the user grants permission. You can request permission using the following code snippet:
let notificationSettings = UIUserNotificationSettings(types: [.alert, .badge, .sound], categories: nil)
UIApplication.shared.registerUserNotificationSettings(notificationSettings)
For a full example, refer to AppDelegate.swift in the SDK sample app, specifically the enableExtendedBackgroundScanning() method
IMPORTANT! App Store Review Information: If you wish to publish an app to the App Store which has “always” background location scanning privileges, Apple’s app-review team takes this seriously. You may need to provide sufficient documentation explaining exactly what and why the background location tracking is used for, and you must demonstrate that you have implemented the proper permission checks according to Apple’s documentation. Apple may contact you to discuss this.
For example, in order to get app review approval for Gallagher’s Mobile Connect application, we were required to submit a video of the app being used in the background, and they contacted us via the phone to discuss and understand the feature.
We are required to place the following text in our app’s description in the App Store:
Continued use of GPS running in the background can dramatically decrease battery life.
We also place the following text in our app review notes in iTunes connect, which we find helps prevent accidental rejection:
The app uses Background location updates to enable scanning for bluetooth readers while the app is in the background.
As previously requested by app review, we have implemented the proper permission check with appropriate description (shown in the video when enabling background scanning) and added the required disclaimer about background location affecting battery life to the app description.
If the user does not grant background location permissions to the app, it detects this, and the “Background Scanning” setting remains off. The app will continue to work correctly in the foreground.
If the user subsequently wants to turn background scanning on, but has previously denied location permissions, the app will detect this and offer to open the iOS Settings app so they can manually grant the location permissions.
Salto
Using SALTO Keys with Mobile Connect
Note: If you are not using the Salto integration on your site, you do not need to add the Salto framework or make any other Salto related changes. You can ignore this section of the developer guide.
1. Add the Salto Framework to Embedded Frameworks
This section can be found in the General tab in the ‘Targets’ section of the Project Editor.

2. Configure Mobile Connect SDK to Include Salto as an Enabled Feature
Add SdkFeature.salto to the list of enabled features passed into the MobileAccessProvider.configure method call.
Reference:
MobileAccessProvider
SdkFeature
3. Implement the SaltoUpdateDelegate
This is a delegate that handles Salto Key updates. Its single callback function onSaltoKeyUpdated will notify of changes to available SaltoKeyIdentifiers.
Add the delegate using the addSaltoUpdateDelegate method. After a delegate is added, it will first be called back with the existing list of available SaltoKeyIdentifiers to be added. After this, the delegate will be called back with any updates as they are received from the Gallagher Cloud.
Any calls to addSaltoUpdateDelegate should be balanced by a call to removeSaltoUpdateDelegate to prevent memory leaks.
Finally, you must call the syncCredentialItemUpdates function which will kick off a sync request to the Gallagher Cloud.
Example:
    func onSaltoKeyUpdated(_ addedOrUpdatedSaltoKeyIdentifiers: [SaltoKeyIdentifier], _ removedSaltoKeyIdentifiers: [SaltoKeyIdentifier]) {
        // process the added or updated Salto Key Identifiers
        for key in addedOrUpdatedSaltoKeyIdentifiers {
            if let updateIndex = _saltoKeyIdentifiers.firstIndex(where: { $0.saltoServerId == key.saltoServerId }) {
                _saltoKeyIdentifiers[updateIndex] = key
            } else {
                _saltoKeyIdentifiers.append(key)
            }
        }

        // process removed Salto Key Identifiers
        for removedKey in removedSaltoKeyIdentifiers {
            _saltoKeyIdentifiers.removeAll { $0.saltoServerId == removedKey.saltoServerId }
        }
    }
Reference:
SaltoUpdateDelegate
SaltoKeyIdentifier
4. Implement the SdkFeatureStateDelegate to be Notified of Any Update Errors
SaltoKeyIdentifier updates are received from the Gallagher Cloud.
Connection problems and other issues may occur which prevent updates from being received. This delegate can be implemented to be notified when such errors or state changes occur.
Delegates should be added using addSdkFeatureStateDelegate. The SDK will asynchronously call the callback methods on the provided delegate to inform you of errors or state changes. Callbacks will arrive on the main thread.
This delegate is a shared channel for receiving errors from all features from SdkFeature. Errors can be filtered by their type to handle a specific feature’s errors.
Examples:
func onFeatureStatesChanged(featureStates: [SdkFeatureState]) {
    let hasCloudConnectionError = featureStates.contains(.errorCloudConnectionFailed)}
    if hasCloudConnectionError {
        toast("Failed to connect to the Gallagher Cloud for updates")
    }
}

func onFeatureError(error: Error) {
    // handle Salto errors here
    if let saltoError = error as? SaltoError {
        toast("A Salto error has been received: \(saltoError)")
    }
}
Reference:
MobileAccess
SaltoError
SdkFeature
SdkFeatureStateDelegate
SdkFeatureState
5. Implement the SaltoAccessDelegate
This delegate provides feedback on Salto access requests, with two callback functions:
onPeripheralFound: A peripheral has been detected after access was requested.onSaltoAccessCompleted: Called after the access transaction has completed successfully, or if an error has occurred.
Example:
// *********************************************************************************
// SaltoAccessDelegate:
// The MobileConnect SDK is telling us that a Salto Peripheral has been detected
// *********************************************************************************
func onPeripheralFound() {
    toast("Salto Peripheral discovered!")
}

// *********************************************************************************
// SaltoAccessDelegate:
// The MobileConnect SDK is telling us that an access result or error has been received
// *********************************************************************************
func onSaltoAccessCompleted(saltoAccessResult: SaltoAccessResult?, error: SaltoError?) {
    if let e = error {
        toast("A salto error has been received \(e.localizedDescription)")
    }

    if let result = saltoAccessResult, let decision = result.saltoAccessDecision {
        // see SaltoAccess Decision for more enum values
        toast("Salto access result received: \(decision.description)")
    }
}
Reference:
SaltoAccessDelegate
SaltoAccessResult - An enum of potential access results
SaltoAccessDecision - An object containing a Salto Access Result and audit event trail
SaltoError
Salto Audit Event Trail Support
The Salto audit event trail sync feature enables the Mobile Connect SDK to receive real-time Salto events for offline Salto readers on remote locations and send them to Command Centre and Salto servers via the Gallagher Cloud without the need for badging at Salto update points.
The Mobile Connect SDK version 16.4 and above has added support for transmitting a Cardholder’s Salto audit event trail for Command Centre Server version 9.0 and above, with the use of Salto JustIN Mobile SDK version 3.1.0.
The feature is not configurable in the Mobile Connect SDK but rather configured at the server and encoded in the Cardholder Salto mobile key.
The event trails sync can be enabled/disabled at a server level or per Cardholder in the Command Centre system.
Digital ID
Using Digital IDs with Mobile Connect SDK
1. Configure Mobile Connect SDK to Include Digital ID as an Enabled Feature
Add SdkFeature.digitalId to the list of enabled features passed into the MobileAccessProvider.configure method call.
Reference:
MobileAccessProvider
SdkFeature
2. Implement the DigitalIdDelegate
This is a delegate that handles Digital ID updates. Its single callback function onDigitalIdUpdated will notify of changes to available Digital IDs.
Add the delegate using the addDigitalIdDelegate method. After a delegate is added, it will first be called back with the existing list of available Digital IDs to be added. After this the delegate will be called back with any updates as they are received from the Gallagher Cloud.
Any calls to addDigitalIdDelegate should be balanced by a call to removeDigitalIdDelegate to prevent memory leaks.
Finally you must call the syncCredentialItemUpdates function which will kick off a sync request to the Gallagher Cloud.
Example:
override func viewDidLoad() {
    ...
    // conversely you should remove yourself as a delegate in deinit or similar
    _mobileAccess.addDigitalIdDelegate(self)

    // request a sync for item updates (i.e. Digital IDs)
    _mobileAccess.syncCredentialItemUpdates()
}

func onDigitalIdUpdated(_ addedOrUpdatedDigitalIds: [DigitalId], _ removedDigitalIds: [DigitalId], lastUpdateTime: Date?) {
    _lastUpdatedTime = lastUpdateTime

    for digitalId in addedOrUpdatedDigitalIds {
        if let index = _digitalIds.firstIndex(where: { $0.id == digitalId.id }) {
            _digitalIds[index] = digitalId
        } else {
            _digitalIds.append(digitalId)
        }
    }

    for removedDigitalId in removedDigitalIds {
        if let index = _digitalIds.firstIndex(where: { $0.id == removedDigitalId.id }) {
            _digitalIds.remove(at: index)
        }
    }
}
Reference:
DigitalId
DigitalIdDelegate
3. Implement the SdkFeatureStateDelegate to be Notified of Any Update Errors
Digital ID updates are received from the Gallagher Cloud.
Connection problems and other issues may occur which prevent updates from being received. This delegate can be implemented to be notified when such errors or state changes occur.
Delegates should be added using addSdkFeatureStateDelegate. The SDK will asynchronously call the callback methods on the provided delegate to inform you of errors or state changes. Callbacks will arrive on the main thread.
This delegate is a shared channel for receiving errors from all features from SdkFeature. Errors can be filtered by their type to handle a specific feature’s errors.
Example:
func onFeatureStatesChanged(featureStates: [SdkFeatureState]) {
    let hasCloudConnectionError = featureStates.contains(.errorCloudConnectionFailed)}
    if hasCloudConnectionError {
        toast("Failed to connect to the Gallagher Cloud for updates")
    }
}

func onFeatureError(error: Error) {
    // handle Digital ID errors here
    if let digitalIdError = error as? DigitalIdError {
        toast("A Digital ID error has been received: \(digitalIdError)")
    }
}
Reference:
MobileAccess
DigitalIdError
SdkFeature
SdkFeatureState
SdkFeatureStateDelegate
Aperio BLE
Using Aperio BLE Access with Mobile Connect SDK
Aperio BLE credentials are used automatically by the Mobile Connect SDK once badged at an Aperio BLE wired and non-wired readers.
Note: Aperio credentials are only used when the SDK is scanning for BLE in the foreground.
1. Configure Mobile Connect SDK to Include Aperio as an Enabled Feature
Add SdkFeature.aperio to the list of enabled features passed into the MobileAccessProvider.configure method call.
Reference:
MobileAccessProvider
SdkFeature
2. Fetching Aperio BLE Credentials
You must call the syncCredentialItemUpdates function which will kick off a sync request of Aperio BLE credentials to the Gallagher Cloud.
Example:
override func viewDidLoad() {
    ...
    // request a sync for item updates (i.e. Aperio BLE credentials)
    _mobileAccess.syncCredentialItemUpdates()
}
3. Implement the SdkFeatureStateDelegate to be Notified of Any Update Errors
Aperio credential updates are received from the Gallagher Cloud.
Connection problems and other issues may occur which prevent updates from being received. This delegate can be implemented to be notified when such errors or state changes occur.
Delegates should be added using addSdkFeatureStateDelegate. The SDK will asynchronously call the callback methods on the provided delegate to inform you of errors or state changes. Callbacks will arrive on the main thread.
This delegate is a shared channel for receiving errors from all features from SdkFeature. Errors can be filtered by their type to handle a specific feature’s errors.
Example:
func onFeatureStatesChanged(featureStates: [SdkFeatureState]) {
    let hasCloudConnectionError = featureStates.contains(.errorCloudConnectionFailed)}
    if hasCloudConnectionError {
        toast("Failed to connect to the Gallagher Cloud for updates")
    }
}

func onFeatureError(error: Error) {
    // handle Aperio credential update errors here
    if let aperioError = error as? AperioError {
        toast("An Aperio error has been received: \(aperioError)")
    }
}
Reference:
MobileAccess
AperioError
SdkFeature
SdkFeatureState
SdkFeatureStateDelegate
3. Access with Aperio BLE Credentials
Aperio BLE credentials are presented automatically by the Mobile Connect SDK instead of Mobile Credentials and it uses the existing “Auto-connect” setup mentioned in Reader Discovery and Access
4. Aperio BLE Reader Discovery
Aperio BLE readers can be discovered using ReaderUpdateDelegate which is the same way of discovering Gallagher BLE readers. For more information refer to “Discovery of Readers” section mentioned in Reader Discovery and Access
Wallet
Wallet Feature Pre-requisites
- Apple Wallet is a licensed feature and requires Command Centre Server v9.10 or later to be enabled and fully configured in order for the Mobile Connect SDK to use the wallet feature.
- The Wallet feature requires:
- iPhone running iOS 16 or later.
- (Optional) paired Apple Watch running watchOS 10 or later.
- Gallagher requires that you provide your Apple App ID (TeamID.AppBundleID) and App Store ID so it can be configured when creating your site’s pass details and template, so that the back of the pass can link to your app.
Other optional details:- App Launch URL (Optional): A URL to be passed to the associated app when launching it from the linked app section of the pass, setting this property requires providing Gallagher your App Store ID.
- App URL Scheme (Optional): URL scheme that the app is registered for to deep link from transaction notifications, setting this property requires providing Gallagher your App Store ID.
- You may consider using a testing environment during development to test your Wallet feature integration. This can be achieved using Sandbox iCloud accounts and non-production Gallagher and Apple services; details can be found on the Gallagher Security Hub SDK page.
Application Required Entitlement
To allow a user to provision a pass to Apple Wallet from within your app, you will need to request the required entitlement from Apple.
1. Request the Entitlement from Apple
Request com.apple.developer.contactless-payment-pass-provisioning:[“shareablecredential”] entitlement by emailing applepayentitlements@apple.com with the following information:
- Your proposed use cases for access pass provisioning.
- The country your business headquarters is located.
- Organisation name.
- Application name.
- Team ID (Your Apple Developer account Team ID).
- App ID (Your app’s App Store ID).
You may use the example email below to request the entitlement. Be sure to replace the placeholders with your app, organisation, and contact details: Email Entitlement Request Template
You will receive an email confirmation if your application is granted the entitlement.
2. Create the Provisioning Profile
After Apple grants you the entitlement, add the entitlement to your application provisioning profile. Ensure that you use the same profile to develop the app in Xcode.
- Create a new identifier or update your existing app identifier with an extra capability by selecting Contactless Pass Provisioning (SharableCredential) Under the Additional Capabilities tab.
- Add a new provisioning profile or update your existing one to use the identifier you created in the previous step.
Note: For Entitlements, select Default to include the entitlement in the profile automatically.
3. Adding the Provisioning Profile
After you generate and download the provisioning profile, add the profile in Xcode to use within your application, make sure that you have unchecked “Automatically manage signing”, select the correct profile under “Signing & Capabilities” tab of the project, and add Contactless Pass Provisioning (ShareableCredential) capability.
To add the entitlement you can:
- Use Xcode
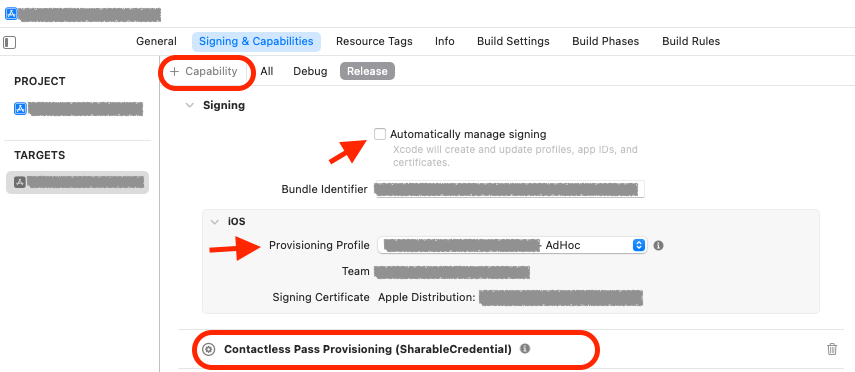
Or
- Create/edit the entitlements plist file for your app with the following key:
<dict>
    <key>com.apple.developer.contactless-payment-pass-provisioning</key>
    <array>
        <string>shareablecredential</string>
    </array>
</dict>
- Make sure your project uses the entitlement plist by setting Build Settings > Code Signing Entitlement to point to the entitlement file you created/edited.
Note: For an example of the entitlement file, refer to mobileconnectsdksample.entitlements in the SDK sample app.
Configure Mobile Connect SDK to Include Wallet Feature
1. Enable the Wallet Feature in the SDK
Add SdkFeature.wallet to the list of enabled features passed into the MobileAccessProvider.configure method call.
Reference:
MobileAccessProvider
SdkFeature
2. Implement the WalletUpdateDelegate
This delegate handles updates to the Wallet. Its callback function onWalletsUpdated notifies the app about changes to Wallets and the availability of related passes in the Apple Wallet app.
Add the delegate using the addWalletUpdateDelegate method. After a delegate is added, it will first be called back with the existing list of available Wallets to be added. After this, the delegate will be called back with any updates as they are received from the Gallagher Cloud or from the Wallet app.
Any calls to addWalletUpdateDelegate should be balanced by a call to removeWalletUpdateDelegate to prevent memory leaks.
Finally you must call the syncCredentialItemUpdates function which will kick off a sync request to the Gallagher Cloud.
Example:
override func viewDidLoad() {
    ...

    mobileAccess.addWalletUpdateDelegate(self)
    // Fetch any registered mobile credential updates from the Gallagher Cloud
    mobileAccess.syncCredentialItemUpdates()
}
deinit {
    ...

    mobileAccess.removeWalletUpdateDelegate(self)
}

func onWalletsUpdated(_ addedOrUpdatedWallets: [Wallet], _ removedWallets: [Wallet]) {
    for wallet in addedOrUpdatedWallets {
        if let walletIndex = wallets.firstIndex(where: { $0.credentialId == wallet.credentialId }) {
            wallets[walletIndex] = wallet
        } else {
            wallets.append(wallet)
        }

        ...
    }

    for wallet in removedWallets {
        wallets.removeAll(where: {$0.credentialId == wallet.credentialId })

        ...
    }
}
Note: For the full example, refer to RegistrationsViewController.swift in the SDK sample app.
Reference:
Wallet
WalletUpdateDelegate
WalletUpdateError
3. Implement the SdkFeatureStateDelegate to be Notified of Any Update Errors
Wallet updates are received from the Gallagher Cloud.
Connection problems and other issues may occur which prevent updates from being received. This delegate can be implemented to be notified when such errors or state changes occur.
Delegates should be added using addSdkFeatureStateDelegate. The SDK will asynchronously call the callback methods on the provided delegate to inform you of errors or state changes. Callbacks will arrive on the main thread.
This delegate is a shared channel for receiving errors from all features from SdkFeature. Errors can be filtered by their type to handle a specific feature’s errors.
Example:
// Convenient way to register for any sdk feature states/errors instead of implementing SdkFeatureStateDelegate directly on the concrete class
mobileAccess.addSdkFeatureStateDelegate { [weak self] featureStates in
    guard let this = self else { return }

    if featureStates.contains(.errorCloudConnectionFailed) {
        this.mobileAccess.syncCredentialItemUpdates() // try connecting again
    } else if featureStates.contains(.errorMobileWalletNotSupported) {
        toast("Wallet feature is not supported for this device, the feature is only available for 'iPhone' devices supporting iOS16 and later")
    }
} onFeatureError: { error in
    if let walletError = error as? WalletUpdateError {
        toast("Wallet update error \(walletError)")
    }
}
Reference:
MobileAccess
WalletUpdateError
SdkFeature
SdkFeatureState
SdkFeatureStateDelegate
4. “Add to Apple Wallet” Button
The “Add to Apple Wallet” button is how a user triggers the process of provisioning a pass to the device and paired watch if one exists.
Add the button to your view
Use the class typePKAddPassButtonto add the button to your view. This ensures compliance with Apple’s Add to Apple Wallet guidelines.Display the button when appropriate
Only show the “Add to Apple Wallet” button when a pass is available to add. You can determine this using one of the approaches listed below.
For more information, see Key Recommendations and Considerations When Displaying the “Add to Apple Wallet” Button.
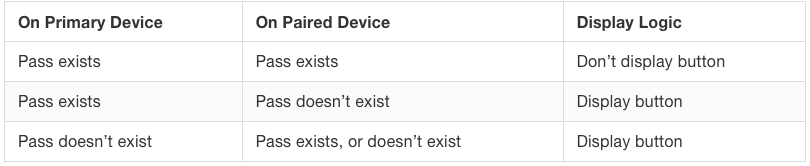
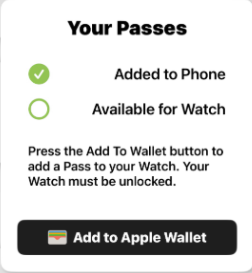
Note: The behavior ofshouldShowAddToWalletButtonandaddToWalletStatusdepends on whether your App ID (TeamID.AppBundleID) is correctly configured in the Apple Pass your site uses. See Wallet Feature Pre-requisites for the required configuration details.Wallet.shouldShowAddToWalletButton()(Simple Logic)
Use this for a basic visibility toggle based on pass availability on the iPhone or Apple Watch. The following table explains the logic behind the helper function:
Wallet.addToWalletStatus(Detailed Status)
Use this for finer control to allow you to tailor the UI based on the pass status for the iPhone and/or Apple Watch.
(Optional) Navigate to the Pass After Provisioning
Use the Wallet instance’s passUrl to link users directly to the pass in the Wallet app once provisioning is complete.
Note: For the code example, refer to RegistrationsViewController.swift in the SDK sample app.
Reference:
Wallet
5. Provision a Pass
Once you add the “Add to Apple Wallet” button in the app, you can use startProvisioningWallet method to initiate provisioning a pass. The SDK will asynchronously call the callback methods on the WalletProvisioningDelegate to inform you of success or failure.
Note: Do not attempt to start pass provisioning unless you have received a valid Wallet instance via the WalletUpdateDelegate.
The Mobile Connect SDK provides a function to trigger pass provisioning for a user. The function is asynchronous and can be triggered from any thread. The result is returned using WalletProvisioningDelegate
private func addWallet(wallet: Wallet?) {
    ...

    // You can choose to implement 'WalletProvisioningDelegate' on a concrete class or use the extension function below provide a block handler for `onWalletMigrationDetected` and `onProvisioningCompleted`
    mobileAccess.startProvisioningWallet(
        wallet,
        passThumbnailImage: templatePassImage,
        passDescription: "Adding Sample App Apple Pass",
        presentingViewController: self,
        onWalletMigrationDetected: { handler in
            handler(true)
        },
        onWalletProvisioningCompleted: { [weak self] wallet, succeeded, error in
            guard let this = self else { return }

            if succeeded {
                // update UI
            } else if let e = error {
                toast("Provisioning wallet failed, try again later.")
            }
        })
}
Note: For the full example, refer to RegistrationsViewController.swift in the SDK sample app.
Reference:
MobileAccess
WalletProvisioningDelegate
Frequently Asked Questions
Why does the Device Need a Passcode Enabled?
If a user attempts to register a mobile credential on an Apple device which does not have a passcode enabled, the registration operation will fail.
This is due to a technical implementation detail and is to improve security.
Internally, the Mobile Connect SDK stores two FIDO credentials for each site.
- The first-factor credential doesn’t require any user-interaction, and is used when the Command Centre Access Zone is not in PINs mode.
- The second-factor credential requires the mobile device user to input either a PIN or their fingerprint/face, and is used when the Command Centre Access Zone is in PINs mode.
The second-factor credential needs to be more secure, because zones in PINs mode typically have much higher physical security requirements. As such, the Mobile Connect SDK requests that Apple performs additional encryption on the keys associated with second-factor credentials. This is implemented in iOS by using the passcode feature, which is why credential registration requires a passcode to be enabled.
Note that if a user registers, then turns off their passcode, the second-factor keys will be invalidated. They will be able to authenticate against readers where the Access Zone is not in PINs mode, however if they attempt to authenticate where second factor is required, they will fail. The only available solution is for that user to re-enable their passcode, then repeat the registration process.
Customising the SDK
Customising SDK Messages
The SDK will at times need to prompt the user for information, such as to enter their fingerprint or passcode. By default the SDK will generate messages in English, however you have the ability to alter these messages - either to simply change the message text to better suit your application, or to translate it into other languages.
To achieve this, you can pass a custom MobileAccessLocalization object to the MobileAccess.configure() method as part of configuring the SDK. You should do this once, at application startup, or before your first use of the SDK.
The MobileAccessLocalization object has three properties which are callback functions. The SDK will invoke these callback functions so you may generate the appropriate message text. This is best explained by example:
let loc = MobileAccessLocalization(
    notificationDetails: { reader in (title: "Open App!", body: "Accessing \(reader.name)") },
    registrationDetails: { siteName in "Register: \"\(siteName)\"" },
    authenticationDetails: { readerName in "Authenticate: \"\(readerName)\"" })

mobileAccess.configure(localization: loc)
All properties are optional.
Reference:
MobileAccessLocalization
1. Notification Details
If your application uses the background access feature of the Mobile Connect SDK, then when the user encounters a reader that is configured to require a second factor, they will need to open the app in order to complete the request. (For example, you can’t prompt someone for their fingerprint when your app isn’t on-screen)
In order to facilitate this, the SDK will show a Local Notification asking the user to open the app. When the SDK wants to show this notification, it will call the notificationDetails localization callback.
The callback will be passed the name of the Bluetooth Reader that they are connecting to, and must return a tuple of (title: String, body: String). The title is used for the first line of the notification message (in bold text) and the body is used for the subsequent lines of the notification message. The notification will display your app’s icon.
If you do not provide a notificationDetails callback, the SDK will default to a callback which is the equivalent of:
(title: "", body: "Open App for \(reader.name)")
Reference:
NotificationDetailsProvider
2. Registration Details
When the user registers a mobile credential, the SDK will ask them for either their Passcode or Fingerprint/Face ID, as per the Registering a Mobile Credential section earlier in this document.
The SDK will show Apple’s system user interface for Fingerprint/Passcode/Face ID, which allows a single custom line of text. It is useful to show the site name on this screen so the user knows what they are registering for.
The callback will be passed the name of the site (as known to the Gallagher Cloud), and should return a message to show on this registration screen.
If you do not provide a registrationDetails callback, the SDK will default to the equivalent of:
"Register for \"\(siteName)\""
Reference:
RegistrationDetailsProvider
3. Authentication Details
When the user attempts to access a door that requires second factor authentication, the SDK will ask them for either their Passcode or Fingerprint/Face ID - whatever they chose when they previously registered their credential.
The SDK will show Apple’s system user interface for Fingerprint/Passcode/Face ID, which allows a single custom line of text. It is useful to the reader name on this screen so the user knows what they are authenticating for.
The callback will be passed the name of the reader, and should return a message to show on this authentication screen.
If you do not provide an authenticationDetails callback, the SDK will default to the equivalent of:
"Authenticate for \"\(readerName)\""
Reference:
AuthenticationDetailsProvider
Troubleshooting
Configuring Logging (Optional)
If you encounter unexpected errors or behaviour, you may wish to enable logging from the SDK to help with troubleshooting.
By default, the SDK will not log anything. To enable logging, you have two options:
Construct a
LogConfiguration(fileURL: aFileUrl)struct, and assign it to static theLog.configurationproperty. This will cause the SDK to write its log output to the given file. You are responsible for creating any subdirectories or otherwise making the file available.Construct a
LogConfiguration(externalWriter: LogWriter)struct, and assign it to static theLog.configurationproperty. When the SDK wishes to log something, it will invokewrite(level: LogLevel, message: () -> String, parameters: LogParameters)method on the externalWriter.
For more information, please refer to the SwiftDocs
For an example, please see the file AppDelegate.swift in the iOS SDK sample application, which redirects the SDK’s internal logging to the system-wide os_log infrastructure.
I’m not Receiving Mobile Credential Updates (i.e. Digital ID or Salto) from the Cloud
Ensure you have added yourself as a delegate and are requesting to sync with the Cloud i.e.
_mobileAccess.addDigitalIdDelegate(self)
_mobileAccess.syncCredentialItemUpdates()
Why is WalletUpdateDelegate returning empty Wallet list?
Make sure that the Apple Employee Access Badge feature is fully configured in the Command Centre Server:
- The site must be licensed and enabled to use the feature.
- The site is configured with valid wallet keys, TCI and Apple Employee Access Badge Type.
- The Mobile Credential registered on the device is configured and linked correctly to the Apple Employee Access Badge Type in your Command Centre server.
![]()
Wallet Pass Provisioning is Failing
Provisioning a pass can fail for multiple reasons at different parts of the flow, all failures are returned as WalletProvisioningError:
- Validation of Command Centre Server setup, the Mobile Credential, and the Cardholder: The validation happens at the start of the provisioning flow. Most failures can be resolved by the operator or later by trying to re-provision again. This type of error is wrapped with
.prepareProvisioningError(message, code). Refer toWalletPrepareProvisioningErrorCodefor the full list of codes.
These are some of the common reasons:
- Command Centre Server misconfiguration.
- Command Centre Server is offline to the Gallagher Cloud.
- Inactive Mobile Credential or de-authorised Cardholder.
- Apple Access Platform Failures: Once the data is validated, the Mobile Connect SDK hands the data to Apple Access Platform.
The user will get a message from Apple communicating the cause of the failure, however, the Mobile Connect SDK can only get a generic error message from Apple PassKit SDK which will be mapped to error.addWalletToSecureElementFailed(message)
Here are some of the possible failures:- An iCloud account binding failure: An iCloud account can only be used against one Cardholder in the Command Centre system. Once a pass is provisioned to a Cardholder, the iCloud account is bound to that Cardholder and cannot be used with other Cardholders.
- Device limits reached failure: The user has migrated the pass more than once to different devices within the last 90 days from the first provisioning.
- Failure adding the pass to Secure Element: This is a rare failure that can happen at the final stage of adding a pass to the device Secure Element.
Note: Due to security concerns, to resolve any binding or device limit failures the site must contact Gallagher Technical Support.
Reference:
WalletProvisioningError
WalletPrepareProvisioningErrorCode
Wallet Feature Calls onWalletMigrationDetected Within the Provisioning Flow
A user is allowed only one pass per device type (iPhone and pair Apple Watch). If the user gets a new iPhone and would like to migrate the pass to the new device then a new Mobile Credential will be required to be issued and registered for the new device and upon clicking the “Add to Apple Wallet” button on the new device a migration will be detected by the Mobile Connect SDK. When the migration is detected, it is recommended to notify and allow the user to confirm the migration before continuing.
To migrate a pass from one paired watch to another, the user will need to remove the pass from the older watch, unpair the old watch, and then re-add the pass to the new watch via the app “Add to Apple Wallet” button.
Notes:
- Only 1 migration per device type is allowed every 90 days.
- Migrating a pass to a new device will remove the pass from the older device.
User Has Passes on Both Phone and Watch but shouldShowAddToWalletButton Function is Suggesting Showing the Button
The function can falsely report that the button should be shown. This may be due to a misconfiguration of the pass details in the Apple Business Register (ABR) portal. The pass details need to be configured with your App ID (TeamID.AppBundleID) in order for the SDK to be able to access and filter the list of passes provided by Apple’s PassKit library. Refer to Wallet Feature Pre-requisites for the required data.
Deactivating the Mobile Credential Doesn’t Deactivate the Apple Pass
Mobile Credentials are used only to provision a pass to the Apple Wallet App. Once the pass is provisioned, it must be managed from within the Apple Wallet app or from the user’s iCloud account.
Add Apple Pass is Active But the User is Getting Access Denied at the Reader
There could be delays between successfully adding Apple pass to the Wallet app and syncing it down to on-premise Command Centre Server and Controller. In most cases the syncing is not noticeable.
Also make sure that “Mobile Wallet” card technology is enabled for the site’s readers.
Key Recommendations and Considerations When Displaying the “Add to Apple Wallet” Button
- The “Add to Apple Wallet” button provisions the pass to both the user’s iPhone and any paired Apple Watch, if available. Provisioning the pass to individual device types is not supported; the pass is added to both the user’s iPhone and any paired Apple Watch simultaneously.
- Always start your UI with the button hidden by default.
- Don’t attempt to display the button if you don’t have a valid
Walletinstance received viaWalletUpdateDelegate. - Keep the button hidden while
MobileAccess.startProvisioningWallet(_:passThumbnailImage:passDescription:presentingViewController:delegate:)is in progress to prevent duplicate provisioning requests. - Display a loading indicator to inform the user that the provisioning process is ongoing. Since this is an asynchronous operation, it may take up to a few minutes to complete.
- If an error occurs in
WalletProvisioningDelegate.onWalletProvisioningCompleted(_:succeeded:error:), you can re-enable the button immediately so the user can retry the provisioning process where applicable. - Upon successful provisioning, reload your view either:
- After a short delay (minimum 0.5 seconds), or
- (preferable) Upon receiving the first wallet update via
WalletUpdateDelegate.onWalletsUpdated(_:_:), This helps prevent redundant provisioning requests caused by premature UI updates.
- Consider showing the “Add to Apple Wallet” button only if neither the phone nor the watch has the pass added. If the pass is available on one device but not the other, provide informative UI to indicate where the pass is currently available.
- Provisioning to Apple Watch can be delayed if the watch is locked or has a low battery. To ensure a smoother and clearer user experience, consider informing your app users to unlock and charge their Apple Watch before adding a pass.